VMware PowerCLI is a collection of PowerShell modules designed to simplify and automate the management of VMware environments. Although PowerCLI started out as a Windows-centric tool, modern versions of PowerShell (including PowerShell Core) have made it possible to install and run PowerCLI on other platforms such as macOS and Linux. This cross-platform capability gives administrators and developers the freedom to manage vSphere, vCenter, and ESXi using their operating system of choice.
Table of Contents
What Is VMware PowerCLI?
VMware PowerCLI is a set of PowerShell modules that provides cmdlets for managing various VMware products. From automating vSphere tasks to scripting advanced VMware Cloud on AWS workflows, PowerCLI empowers administrators to handle large or small VMware environments with ease. Common use cases include:
- Automating repetitive tasks (e.g., provisioning, configuration)
- Performing bulk operations on ESXi hosts or virtual machines
- Integrating VMware tasks into broader PowerShell scripts
Why Install VMware PowerCLI?
Efficiency
Automate or script common vSphere tasks that would otherwise require multiple clicks in the vSphere Client.
Consistency
Enforce the same configurations or security policies across multiple ESXi hosts or virtual machines, ensuring uniform environments.
Scalability
Manage hundreds or even thousands of hosts and VMs through scripts, reducing manual overhead and potential human errors.
Integration
PowerCLI integrates seamlessly with other PowerShell modules, making it easier to blend VMware tasks with your existing automation and CI/CD pipelines.
Prerequisites
Before installing VMware PowerCLI, ensure you have the following:
- PowerShell 7 (Preferred) or Windows PowerShell 5.1
- Windows users often have PowerShell 5.1 by default. However, installing the latest PowerShell Core (7.x) is recommended for cross-platform compatibility.
- macOS and Linux users can install PowerShell Core from Microsoft’s documentation (Note: this link is for reference in a normal scenario; in an offline environment, consult local documentation or distribution repositories).
- Administrator / Elevated Permissions
- Windows: Run PowerShell as Administrator to install for all users.
- macOS and Linux: Prepend commands with sudo if installing for all users.
- Internet Connectivity
- The installation process fetches modules from the PowerShell Gallery, so make sure your system can access it (firewall, proxy, etc.).
Understanding the Installation Command
A typical PowerCLI installation command looks like this:
Install-Module -Name VMware.PowerCLI -Scope AllUsers -Force -SkipPublisherCheck
Command Breakdown
- Install-Module: The PowerShell cmdlet used to install modules from a repository (by default, the PowerShell Gallery).
- -Name VMware.PowerCLI: Specifies the exact name of the module to install—VMware.PowerCLI.
- -Scope AllUsers: Installs the module for every user on the machine, rather than just the current user.
- -Force: Automatically installs or updates the module and its dependencies. Overrides prompts during installation.
- -SkipPublisherCheck: Bypasses certificate checks from the module’s publisher.
Security Note: Use this parameter only if you trust the source and have encountered certificate chain issues.
Step-by-Step Installation
Windows

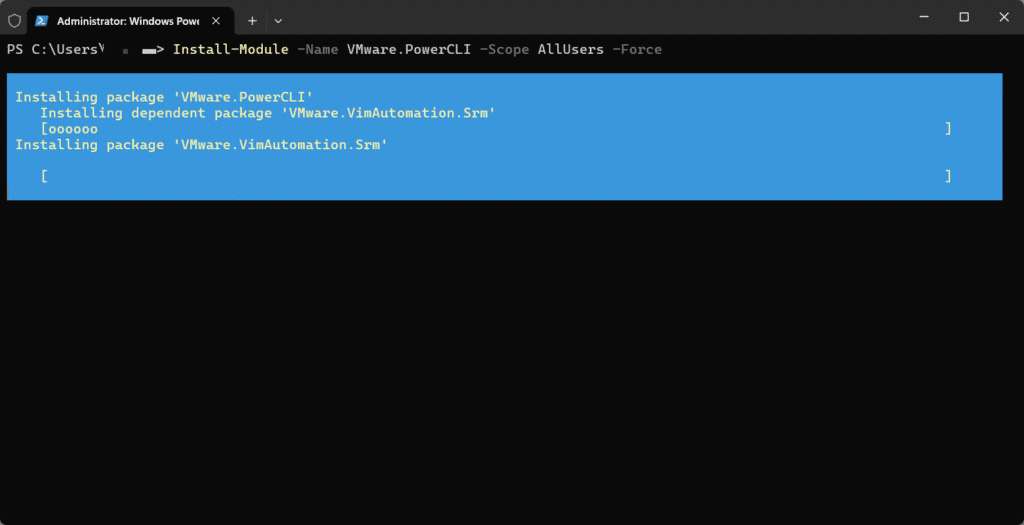
- Open PowerShell (with Elevated Privileges)
- Click the Start menu, type “PowerShell,” right-click on Windows PowerShell, and select Run as administrator.
- Run the Installation Command
Install-Module -Name VMware.PowerCLI -Scope AllUsers -Force
- Respond to Prompts
- If prompted about installing from an untrusted repository, type Y (Yes) or A (Yes to all).
- Let the download and installation complete.
- Verify
- See Verifying Your Installation below.
macOS or Linux

- Open PowerShell
- Launch PowerShell by typing
pwshin your Terminal.
- Launch PowerShell by typing
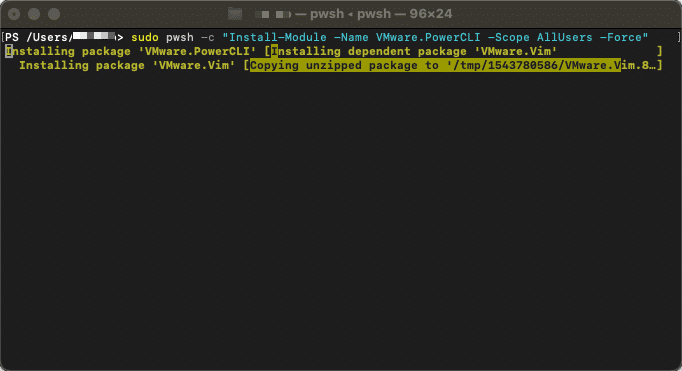
- Install VMware PowerCLI
- If you have privileges, you can run:
sudo pwsh -c "Install-Module -Name VMware.PowerCLI -Scope AllUsers -Force" - Alternatively, omit
-Scope AllUsersif you want to install it only for your current user:Install-Module -Name VMware.PowerCLI -Scope CurrentUser -Force
- If you have privileges, you can run:
- Accept the Repository Prompt
- Type Y or A when prompted about an untrusted repository.
- Wait for Completion
- PowerShell will download and install the necessary modules.
- Verify
- See Verifying Your Installation below.
Verifying Your Installation
Regardless of your operating system, follow these steps in PowerShell to confirm that VMware PowerCLI is installed correctly.
- List Installed Modules
Get-Module -ListAvailable VMware.PowerCLI- This command will show module information if VMware.PowerCLI is installed.
- Import the Module (If Needed)
Import-Module VMware.PowerCLI- Some environments automatically import the module upon opening PowerShell. If not, manually import it.
- Check PowerCLI Version
Get-PowerCLIVersion- This cmdlet displays the installed PowerCLI version and release date.
If these commands return version details without errors, you’re all set!
Installing VMware PowerCLI across Windows, macOS, or Linux is a straightforward process that harnesses the versatility of modern PowerShell. Once installed, VMware PowerCLI unlocks a robust command-line toolset, enabling you to automate tasks, maintain consistency across multiple VMware environments, and integrate seamlessly with other scripts and tools. Whether you’re a seasoned administrator or a newcomer to PowerCLI, this cross-platform compatibility brings new levels of efficiency and flexibility to your virtualization management routines.


