RoutIT is a Dutch internet provider that offers /56 IPv6 subnets to its customers. In this blog post, I will show you how to set up this IPv6 subnet on your Ubiquiti UniFi Network. First, ensure that you have enabled the IPv6 subnet on your internet subscription. RoutIT routes IPv6 addresses over PPP and does not support SLAAC or DHCPv6. Therefore, the IPv6 address must be configured statically.

First, check your connection details to obtain the IPv6 information for your internet subscription. In this example, we use the IPv6 block 2a02:22a0:xxxx:5600::/56.
After obtaining your IPv6 details, access your UniFi Cloud Key Console. Navigate to Settings > Internet and select the WAN you want to configure.

Table of Contents
Configure the IPv6 settings as follows:
- Set the IPv6 Connection to
DHCPv6. - Set the Prefix Delegation Size to
56. - DNS Server:
- Option 1: Keep it on
Autoto use the default DNS servers provided by RoutIT. - Option 2: Use your preferred DNS servers. In this example, we use Cloudflare’s IPv6 DNS servers (
2606:4700:4700::1112 and2606:4700:4700::1002), which help block malware and enhance security.
- Option 1: Keep it on

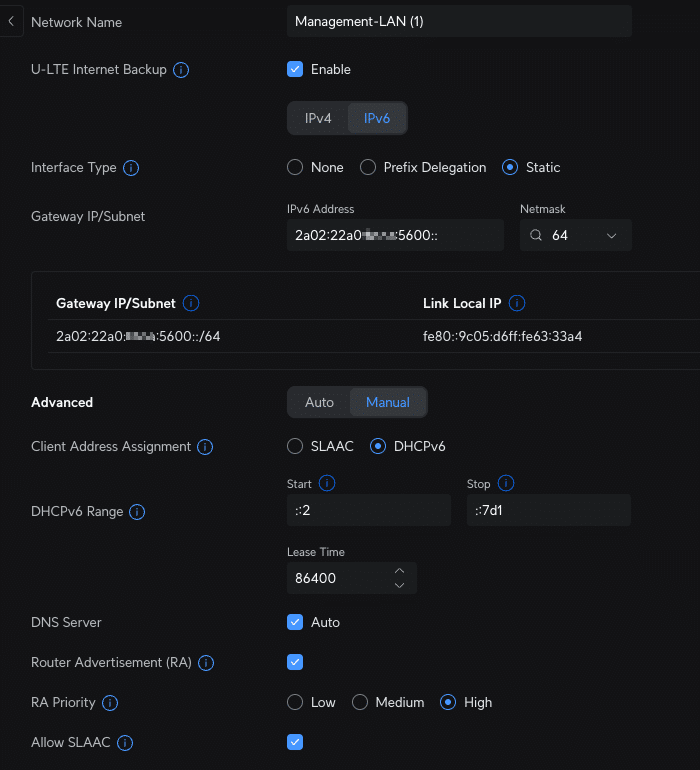
After setting up your WAN connection, navigate to Settings > Networks in your UniFi Cloud Key Console. Select the network where you want to enable IPv6.
Configure IPv6 Settings:
Apply the following settings to enable IPv6 on the selected network:
- Interface Type:
Static - Gateway IP/Subnet:
2a02:22a0:xxxx:5600::/64
Advanced Settings:
- Leave on
Autoto use default configurations. - Or select
Manualif you prefer to customize additional IPv6 parameters.
Repeat for Additional Networks:
If you have multiple networks (e.g., a guest network), repeat the above steps for each one, assigning a unique /64 subnet from your /56 IPv6 block. For example:
- Guest Network:
- Gateway IP/Subnet:
2a02:22a0:xxxx:5601::/64
- Gateway IP/Subnet:
Continue allocating subnets incrementally up to:
- Final Subnet:
- Gateway IP/Subnet:
2a02:22a0:xxxx:56ff::/64
- Gateway IP/Subnet:
Note: A /56 IPv6 block provides 256 /64 subnets, allowing ample address space for segregating different network segments or VLANs.
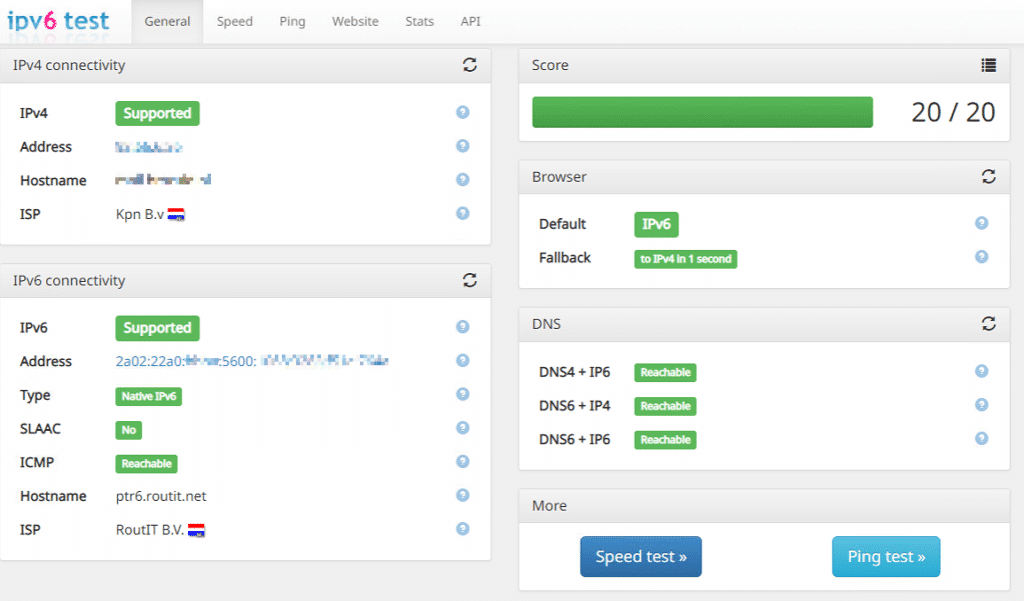
Verify IPv6 Configuration:
After configuring IPv6 on all desired networks, ensure that devices connected to these networks receive the correct IPv6 addresses and can access IPv6-enabled resources.

You can verify this by:
- Visiting IPv6-enabled websites (e.g., https://ipv6-test.com/).
- Using online IPv6 testing tools.
- Checking device network settings to confirm they have obtained IPv6 addresses from the configured subnets.


Thank you very much for this publication.
Because Routit said SLAAC and DHCPv6 are not supported I could not fix this.
Thanks to you it’s finally running.