Efficient disk space management is essential for the seamless operation of your Exchange Server. A frequent challenge administrators encounter is the UnifiedContent folder occupying substantial disk space, triggering low disk space warnings and degrading system performance. This guide explores the indicators, underlying causes, and effective solutions to manage the UnifiedContent folder, ensuring your Exchange environment remains robust and efficient.
Table of Contents
Identifying the Issue
You might suspect the UnifiedContent folder is problematic if you notice:
- Disk Space Warnings: Alerts indicating limited free space on the drive hosting your Exchange Server.
- Slow Performance: Delays in opening files and applications stored on the affected drive.
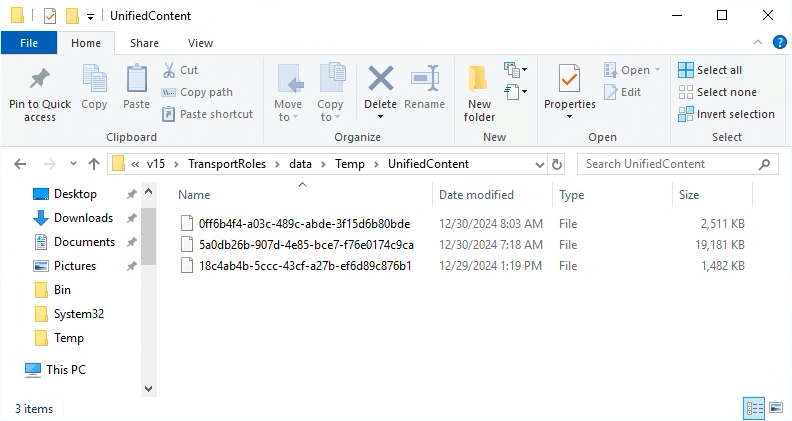
- High Folder Size: An examination of the
%ExchangeInstallPath%\TransportRoles\data\Temp\UnifiedContentdirectory reveals it occupies a significant portion of the disk.

Understanding the Root Cause
The UnifiedContent folder is integral to Exchange Server’s functionality, particularly for antimalware scanning processes. Exchange generates temporary files in this directory, which are typically managed by the Microsoft Exchange Health Manager service through scheduled cleanup tasks. However, certain situations can disrupt this cleanup mechanism:
- Non-Standard Installation Directory:
- Problem: Installing Exchange Server outside the default path (
C:\Program Files\Microsoft\Exchange Server\V15) results in the UnifiedContent folder being located elsewhere. - Consequence: The Health Manager service fails to locate and clean up the folder, leading to disk space issues.
- Problem: Installing Exchange Server outside the default path (
- Customizing the UnifiedContent Folder Location:
- Problem: Manually changing the UnifiedContent folder path by modifying the
TemporaryStoragePathin%ExchangeInstallPath%\Bin\EdgeTransport.exe.configor using theMove-TransportDatabase.ps1script that can be find in the following path:%ExchangeInstallPath%Scripts. - Consequence: The cleanup task references the default path specified in the
Antimalware.xmlfile, ignoring the new location and preventing proper cleanup.
- Problem: Manually changing the UnifiedContent folder path by modifying the
Technical Insight:
- The
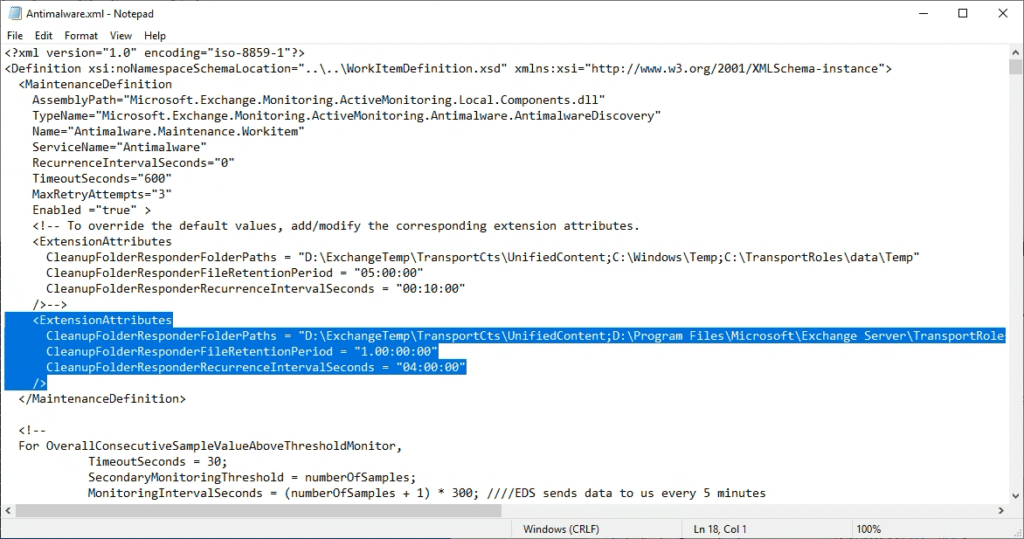
CleanupFolderResponderFolderPathsattribute in the%ExchangeInstallPath%\Bin\Monitoring\Config\Antimalware.xmlfile dictates the location of the UnifiedContent folder. - By default, this points to
C:\Program Files\Microsoft\Exchange Server\V15\TransportRoles\data\Temp\UnifiedContent. - Deviations from this path, whether due to non-standard installations or manual relocations, cause the Health Manager to overlook the actual folder location, resulting in unchecked growth of the UnifiedContent directory.
Implementing Solutions
To resolve the issue of the UnifiedContent folder monopolizing disk space, you need to align the Antimalware.xml configuration with the actual folder location. Below are two approaches to achieve this:
⚠ Important:
Be aware that applying cumulative updates to Exchange Server might overwrite changes made to Antimalware.xml. After such updates, you may need to reapply these solutions.
Solution 1: Manually Edit Antimalware.xml

Execute the following steps on each Exchange Server within your infrastructure:
- Backup the Configuration File:
- Recommendation: Before making any changes, create a backup of the
Antimalware.xmlfile and store it securely in a separate directory.
- Recommendation: Before making any changes, create a backup of the
- Locate the UnifiedContent Folder Path:
- Use File Explorer to navigate to
%ExchangeInstallPath%\TransportRoles\data\Temp\UnifiedContent. - Copy the full path of this folder.
- Use File Explorer to navigate to
- Modify Antimalware.xml:
- Open
%ExchangeInstallPath%\Bin\Monitoring\Config\Antimalware.xmlwith a text editor that has administrative privileges. - Find the
CleanupFolderResponderFolderPathsattribute.
- Open
- Update the Folder Path:
- Replace the default path (
C:\Program Files\Microsoft\Exchange Server\V15\TransportRoles\data\Temp\UnifiedContent) with the actual path you copied earlier. - Example Modification:
- Replace the default path (
<CleanupFolderResponder FolderPaths="D:\ExchangeTemp\TransportCts\UnifiedContent;C:\Windows\Temp\UnifiedContent;D:\CustomPath\UnifiedContent" />
- Save and Apply Changes:
- Save the edited
Antimalware.xmlfile. - Restart the Exchange Health Manager service to apply the updates. This can be done via the Services console or by running:
- Save the edited
Restart-Service MSExchangeHM
- Confirm the Fix:
- The Health Manager will initiate a cleanup during the next scheduled maintenance cycle (typically every four hours). Monitor the UnifiedContent folder to ensure it no longer grows uncontrollably.
Solution 2: Utilize a PowerShell Script
For a streamlined and automated approach, employ the SetUnifiedContentPath PowerShell script to adjust the CleanupFolderResponderFolderPaths setting in Antimalware.xml.
- Acquire the Script:
- Ensure you have access to the
SetUnifiedContentPath.ps1script. If unavailable, you may need to create it or source it from a reliable provider.
- Ensure you have access to the
- Run the Script:
- Open PowerShell with administrative rights.
- Navigate to the directory containing the
SetUnifiedContentPath.ps1script. - Execute the script, specifying the new UnifiedContent folder path:
.\SetUnifiedContentPath.ps1 -NewPath "D:\CustomPath\UnifiedContent"
- Restart the Health Manager Service:
- Apply the changes by restarting the service:
Restart-Service MSExchangeHM
- Verify the Outcome:
- Similar to Solution 1, observe the UnifiedContent folder during the next maintenance cycle to ensure that cleanup operations are functioning correctly.
Best Practices and Additional Tips
- Continuous Monitoring: Implement robust monitoring tools to track disk usage and detect anomalies in critical directories like UnifiedContent.
- Regular Maintenance Checks: Ensure that cleanup tasks and maintenance cycles are functioning as intended and are not impeded by other processes or permission issues.
- Comprehensive Documentation: Maintain up-to-date records of all configuration changes and custom setups to facilitate future maintenance and troubleshooting efforts.
Disk space challenges related to the UnifiedContent folder can severely impact the performance and stability of your Exchange Server environment. By identifying the root causes and applying effective solutions—whether through manual configuration adjustments or automated scripts—you can maintain optimal disk usage and ensure the smooth operation of your Exchange infrastructure. Additionally, recognizing and leveraging the expertise of a skilled Exchange administrator is crucial, especially in environments with non-standard installations. Their knowledge and problem-solving capabilities are essential for preventing and resolving issues that arise from customized configurations. Always remember to back up critical configuration files before making changes and continuously monitor your system to verify the effectiveness of your solutions.


